|
|
The
'World' buttons within Blender |
|
|
|
The
'World' buttons within Blender |
|
|
|
|
|
|
|
|
|
|
|
S t e p 5 :
|
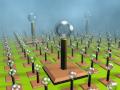
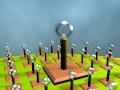
These four buttons defines how the texture will be mixed with general parameters. Mist ignores troubles you can have with the location of the horizon line, as seen before. You jsut have to add a plane with a high size value in order to get your ground. Of course, the junction between the plane and the sky can't be very realist. But by tweaking a little the mist settings, you can make sure that the bad-looking junction is hidden by the mist. You can then create a 'World' environment like the one on the pic on the right. |
|
|
|
|
|
|
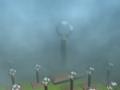 The
most useful parameter is 'Di'. It defines the transparency of the
mist along the axis (or line of sight) of the camera. On the left
picture, 'Sta' is set to 0 and 'Di' is set to 170 in order to get a
far mist. On the right picture, 'Di' is set to 60 and 'Sta' is set to
10 in order to get a closer and thicker mist, although we didn't
wanted it too close to the camera.
The
most useful parameter is 'Di'. It defines the transparency of the
mist along the axis (or line of sight) of the camera. On the left
picture, 'Sta' is set to 0 and 'Di' is set to 170 in order to get a
far mist. On the right picture, 'Di' is set to 60 and 'Sta' is set to
10 in order to get a closer and thicker mist, although we didn't
wanted it too close to the camera.
|
|
|
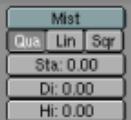
The 3 parameter buttons defines how the mist behaves.
The three following pics show the slight differences between 'Quad', 'Lin', and 'Sqr'. 'Unified render' also has a slight influence on the mist effect. It has been activated for each of these three pictures. Please note the difference between the rendering of the square bases on the first pic and the one on the last previous picture on the right. |
|
|
|
|
|
|
|
The last button is 'Hi'. If the 'Hi' value is different than 0, the mist spread is given a maximum heigth value. The low values (pic1: Hi=0.4) are not so good looking. Pic 2: Hi=60 gives better results. Pic 3: 'Hi' is set to 90. 'Unified Render' was set 'on' for these 3 pictures. |
|
|
|
|
|
|
|
|
|
|
|
|
|
|
|
|
|
|


 Mist:
Mist:
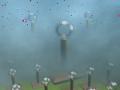
 Once
this is done, set the 'Mist' button to 'on' and make a render to
get the strange result on the left. This is a normal situation.
The world texture has been moved to the foreground. First thing to
do is to increase the 'Sta' parameter, because it defines the
distance between the camera and the location where the mist starts
to show (the following values are the one used in this example,
but the depends heavily on the size of your scene). Set 'Sta' to
70 and the result will be a little more good looking.
Once
this is done, set the 'Mist' button to 'on' and make a render to
get the strange result on the left. This is a normal situation.
The world texture has been moved to the foreground. First thing to
do is to increase the 'Sta' parameter, because it defines the
distance between the camera and the location where the mist starts
to show (the following values are the one used in this example,
but the depends heavily on the size of your scene). Set 'Sta' to
70 and the result will be a little more good looking.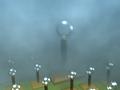
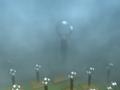

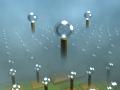
 Some
stars in the mist ? The two effects don't get along very well...
On the left, with the standard rendering engine, the result is
very bad looking. On the right, with the 'Unified Render' it's
even worse. Nobody's perfect, just forget about this combo...
Some
stars in the mist ? The two effects don't get along very well...
On the left, with the standard rendering engine, the result is
very bad looking. On the right, with the 'Unified Render' it's
even worse. Nobody's perfect, just forget about this combo...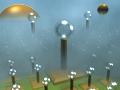
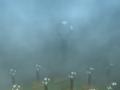
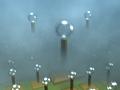
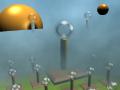 Planets
in the mist ? It's a better idea. Please note that mist hides
everything on the background, so there are two solutions: on the
left, the 'No Mist' material setting is 'on' for the two planets.
This is not very good looking, because of the edges of the plane
that show again. Setting the 'Hi' parameter will help with a
satisfactory result !
Planets
in the mist ? It's a better idea. Please note that mist hides
everything on the background, so there are two solutions: on the
left, the 'No Mist' material setting is 'on' for the two planets.
This is not very good looking, because of the edges of the plane
that show again. Setting the 'Hi' parameter will help with a
satisfactory result !